Gracias por comentar 🙌 acá tenés el recurso.
Efecto 360 con IA.
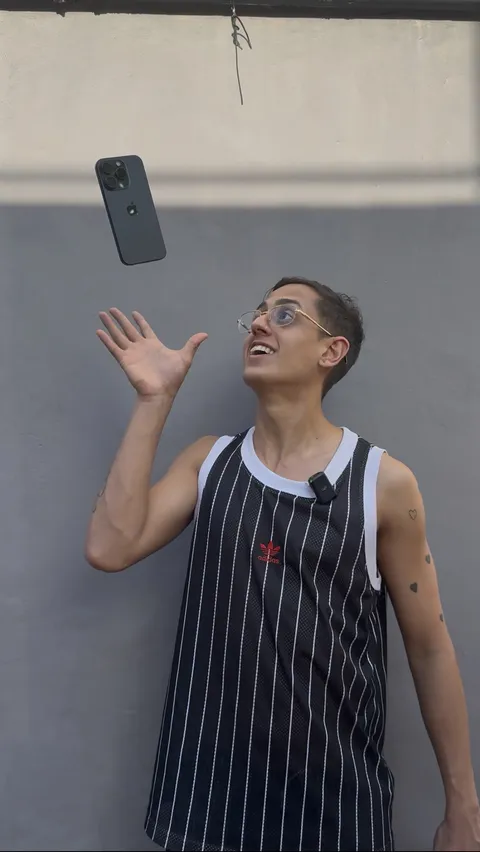
1 captura. 8 segundos. Un acercamiento macro y un recorrido de cámara alrededor de tu iPhone, desde una sola imagen.
El paso a paso
Una sola captura.
Todo empieza con tu grabación del lanzamiento.
Grabá el lanzamientoGrabate tirando el celular hacia arriba, con la parte trasera y las cámaras visibles.Sacá la capturaPausá el video cuando el celular esté arriba, suspendido en el aire, y sacá una captura.Generá en SeedanceSubí esa imagen como @image1. Elegí 8 segundos y pegá juntas las dos partes del prompt.Elegí un frame lo más nítido posible. El celular y sus cámaras tienen que distinguirse bien.
El prompt, listo para copiar.
Son dos partes. Pegalas juntas, una después de la otra. O copiá todo de una.
Create an 8-second photorealistic premium smartphone macro-orbit shot.
Use @image1 as the exact starting frame and as the sole reference for the
phone's appearance, geometry, the person, and the environment.
CAMERA CHOREOGRAPHY IS THE PRIORITY:
0-1.5 seconds:
Begin exactly from @image1. Suspend the phone at the apex of its toss,
with the person almost frozen in time. Quickly and smoothly move the
camera forward and slightly sideways toward the rear cameras. Reach
extreme macro magnification: the camera module fills the entire frame.
1.5-3 seconds:
Travel very close past the first raised lens at an oblique angle. Clearly
reveal the thickness of its metallic ring and the depth of its glass. Move
laterally so the nearest lens passes across the foreground while the other
lenses shift behind it with strong natural parallax.
3-4.5 seconds:
Continue along a curved path around the camera module, rising slightly
and rolling the camera smoothly by approximately 30 degrees. Glide
between close views of the lens rings, glass reflections, flash, and rear
surface. Individual lenses extend beyond the frame edges. Keep the
movement continuous and visibly three-dimensional.
4.5-6 seconds:
Sweep diagonally down across the rear glass toward the logo, then curve
around the side edge to reveal the phone's thickness. Maintain fluid
movement, shallow depth of field, and precise focus transitions. Use
realistic reflections and subtle metallic highlights consistent with the
existing environment.
6-8 seconds:
Smoothly pull back toward the original scene and camera viewpoint
established in @image1. Resume normal time and let the phone begin
descending naturally toward the person's raised hand. End just before the
catch, with the phone still airborne, so the generated shot can connect to
a separately filmed catching shot in editing. Preserve the phone's size
and orientation consistently throughout the motion.
The phone remains rigid and nearly stationary during the macro passage.
The camera physically travels around it. Preserve the exact lens count,
camera arrangement, logo shape, color, case if present, buttons,
materials, and proportions visible in @image1.
Preserve the person's facial identity, anatomy, clothing, and the
environment's structure and lighting. Background movement must come
only from coherent perspective changes and natural optical blur.
One continuous shot with smooth acceleration and deceleration. No
prolonged frontal zoom, static close-up, flat image enlargement, cuts,
morphing, warped lenses, changing logos, duplicated phones, facial
distortion, room deformation, text, or graphics.
Create an 8-second photorealistic premium smartphone macro-orbit shot.
Use @image1 as the exact starting frame and as the sole reference for the
phone's appearance, geometry, the person, and the environment.
CAMERA CHOREOGRAPHY IS THE PRIORITY:
0-1.5 seconds:
Begin exactly from @image1. Suspend the phone at the apex of its toss,
with the person almost frozen in time. Quickly and smoothly move the
camera forward and slightly sideways toward the rear cameras. Reach
extreme macro magnification: the camera module fills the entire frame.
1.5-3 seconds:
Travel very close past the first raised lens at an oblique angle. Clearly
reveal the thickness of its metallic ring and the depth of its glass. Move
laterally so the nearest lens passes across the foreground while the other
lenses shift behind it with strong natural parallax.
3-4.5 seconds:
Continue along a curved path around the camera module, rising slightly
and rolling the camera smoothly by approximately 30 degrees. Glide
between close views of the lens rings, glass reflections, flash, and rear
surface. Individual lenses extend beyond the frame edges. Keep the
movement continuous and visibly three-dimensional.
4.5-6 seconds:
Sweep diagonally down across the rear glass toward the logo, then curve
around the side edge to reveal the phone's thickness. Maintain fluid
movement, shallow depth of field, and precise focus transitions. Use
realistic reflections and subtle metallic highlights consistent with the
existing environment.
6-8 seconds:
Smoothly pull back toward the original scene and camera viewpoint
established in @image1. Resume normal time and let the phone begin
descending naturally toward the person's raised hand. End just before the
catch, with the phone still airborne, so the generated shot can connect to
a separately filmed catching shot in editing. Preserve the phone's size
and orientation consistently throughout the motion.
The phone remains rigid and nearly stationary during the macro passage.
The camera physically travels around it. Preserve the exact lens count,
camera arrangement, logo shape, color, case if present, buttons,
materials, and proportions visible in @image1.
Preserve the person's facial identity, anatomy, clothing, and the
environment's structure and lighting. Background movement must come
only from coherent perspective changes and natural optical blur.
One continuous shot with smooth acceleration and deceleration. No
prolonged frontal zoom, static close-up, flat image enlargement, cuts,
morphing, warped lenses, changing logos, duplicated phones, facial
distortion, room deformation, text, or graphics.
El cierre en edición
Grabá también la recepción.
Hacé otra toma como si estuvieras agarrando el celular después del giro. Esa grabación completa el efecto en la edición.
Usá la grabación original hasta el momento de la captura, con el celular arriba.
Continuá con el clip de Seedance: acercamiento, recorrido de cámara y regreso a la escena.
Cerrá con la segunda grabación. Ajustá el corte para que el movimiento y la posición del celular encajen.
Ojo: la toma agarrando el celular es solo para edición. No la cargues en la IA. El efecto se genera con una única imagen: la del celular suspendido en el aire.
¿Querés ir más allá?
Aprendé a crear con IA en la Escuela.
Un curso por suscripción para crear imágenes, modelos IA y videos, paso a paso.
— Laucha · @laucharamos10